


DC Shoes are known for their unique style and functionality, making them a popular choice among skaters and streetwear enthusiasts. One of the best ways to personalize your DC shoes is by lacing them in different styles. Here are 8 popular ways to lace your DC shoes to make them stand out:
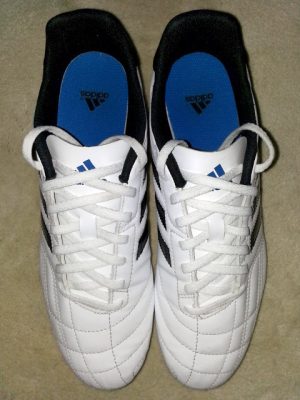
Straight Bar Lacing:
Straight bar lacing is a timeless and straightforward lacing technique that gives your shoes a clean and classic look. This style is popular among those who prefer a simple yet stylish appearance for their footwear. Whether you’re lacing up a pair of sneakers, dress shoes, or boots, straight bar lacing is a versatile option that can elevate the look of any shoe.
How to Straight Bar Lace Your Shoes:
-
Step 1: Begin by inserting one end of the lace into the bottom eyelet of the shoe, ensuring that the lace is even on both sides.
-
Step 2: Pull the lace through the bottom eyelet, leaving a small tail inside the shoe.
-
Step 3: Take the right end of the lace and thread it straight across to the opposite eyelet on the left side.
-
Step 4: Pull the lace through the left eyelet, ensuring that it lays flat against the shoe.
-
Step 5: Repeat this process, alternating between the right and left sides, until you reach the top of the shoe.
-
Step 6: Once you reach the top, tie a knot to secure the laces in place.
-
Step 7: Adjust the tension of the laces as needed to ensure a snug fit.
Straight bar lacing is a great way to add a touch of sophistication to your shoes while keeping the overall look clean and minimalistic. Whether you’re dressing up for a formal occasion or just want to add a touch of style to your everyday look, straight bar lacing is a simple yet effective way to enhance the appearance of your footwear.
Criss-Cross Lacing:
Criss-cross lacing is one of the most common and classic ways to lace your shoes. This technique provides a secure fit while adding a touch of style to your footwear. Whether you’re lacing up a pair of sneakers, boots, or dress shoes, criss-cross lacing is a versatile option that can complement any style.
How to Criss-Cross Lace Your Shoes:
-
Step 1: Begin by inserting one end of the lace into the bottom eyelet of the shoe, ensuring that the lace is even on both sides.
-
Step 2: Pull the lace through the bottom eyelet, leaving a small tail inside the shoe.
-
Step 3: Take the right end of the lace and cross it over to the opposite side, inserting it into the second eyelet on the left side.
-
Step 4: Pull the lace through the eyelet, ensuring that it lays flat against the shoe.
-
Step 5: Repeat this process on the other side, crossing the left end of the lace over to the second eyelet on the right side.
-
Step 6: Continue crossing the laces over each other, threading them through the eyelets in a criss-cross pattern until you reach the top of the shoe.
-
Step 7: Once you reach the top, tie a knot to secure the laces in place.
-
Step 8: Adjust the tension of the laces as needed to ensure a snug fit.
Criss-cross lacing is a practical and stylish way to secure your shoes while adding a touch of flair to your look. Whether you’re heading to the office or out for a casual stroll, criss-cross lacing is a tried-and-true method that will keep your shoes secure and looking sharp.
Spider Web Lacing:
Spider web lacing is a fun and eye-catching way to lace your shoes, creating a unique and intricate pattern that sets your footwear apart from the rest. This lacing technique is perfect for those looking to add a bit of personality to their shoes and is sure to turn heads wherever you go.
How to Spider Web Lace Your Shoes:
-
Step 1: Begin by inserting one end of the lace into the bottom eyelet of the shoe, leaving a small tail inside the shoe.
-
Step 2: Take the right end of the lace and thread it diagonally across the shoe to the second eyelet on the left side.
-
Step 3: Pull the lace through the eyelet, ensuring that it lays flat against the shoe.
-
Step 4: Cross the left end of the lace over to the second eyelet on the right side, creating an “X” pattern.
-
Step 5: Pull the lace through the eyelet, again ensuring that it lays flat against the shoe.
-
Step 6: Continue this pattern, alternating between the right and left sides, creating a series of diagonal “X” patterns across the shoe.
-
Step 7: Once you reach the top of the shoe, tie a knot to secure the laces in place.
-
Step 8: Adjust the tension of the laces as needed to ensure a snug fit.
Spider web lacing is a creative and unique way to add a personal touch to your shoes. Whether you’re heading to a music festival, a night out with friends, or just want to make a statement with your footwear, spider web lacing is sure to make your shoes stand out from the crowd.
Jordan Laces: Where Ordinary Becomes Extraordinary


Dare to be different with Loop King Laces, the ultimate choice for sneaker enthusiasts who crave a touch of individuality. These laces aren’t just strings—they’re statements, crafted with premium materials and an eye for detail.
What makes Loop King Laces stand out is their ability to transform your sneakers into a canvas of self-expression. With a spectrum of colors, patterns, and materials to choose from, you can mix and match to create a look that’s as unique as you are. Want to add a dash of personality to your everyday kicks? Loop King Laces has you covered. Looking to turn heads with a bold, daring design? They’ve got that too.
So why settle for ordinary laces when you can have extraordinary? Elevate your sneaker game with Loop King Laces and make every step a statement of style and individuality.
Loop Back Lacing:
Loop back lacing is a trendy and stylish way to lace your shoes, creating a layered and textured look that adds a unique flair to your footwear. This lacing technique is not only fashionable but also practical, providing a secure fit that keeps your shoes snug and comfortable throughout the day.
How to Loop Back Lace Your Shoes:
-
Step 1: Begin by inserting one end of the lace into the bottom eyelet of the shoe, leaving a small tail inside the shoe.
-
Step 2: Take the right end of the lace and thread it straight across to the opposite eyelet on the left side.
-
Step 3: Pull the lace through the eyelet, leaving a loop on the outside of the shoe.
-
Step 4: Cross the left end of the lace over to the opposite side, threading it through the loop created by the right lace.
-
Step 5: Pull the left lace through the loop, tightening the knot to secure the laces in place.
-
Step 6: Continue this pattern, creating a series of loops and knots that run up the shoe in a layered fashion.
-
Step 7: Once you reach the top of the shoe, tie a knot to secure the laces in place.
-
Step 8: Adjust the tension of the laces as needed to ensure a snug fit.
Loop back lacing is a fun and creative way to add a personal touch to your shoes. Whether you’re looking to make a fashion statement or simply want to try something new with your laces, loop back lacing is a great option that is sure to turn heads.
Checkerboard Lacing:
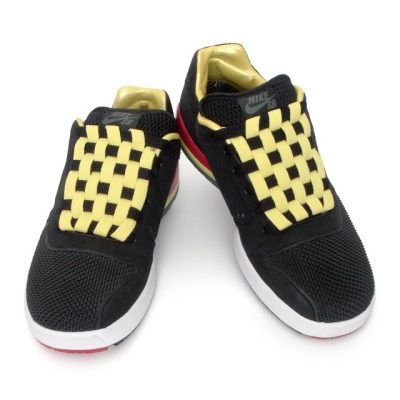
Checkerboard lacing is a creative and attention-grabbing way to lace your shoes, creating a checkered pattern that adds a pop of personality to your footwear. This lacing technique is perfect for those looking to make a bold statement with their shoes and is sure to draw compliments wherever you go.
How to Checkerboard Lace Your Shoes:
-
Step 1: Begin by inserting one end of the lace into the bottom eyelet of the shoe, leaving a small tail inside the shoe.
-
Step 2: Take the right end of the lace and thread it straight across to the second eyelet on the left side.
-
Step 3: Pull the lace through the eyelet, ensuring that it lays flat against the shoe.
-
Step 4: Cross the left end of the lace over to the second eyelet on the right side, creating a diagonal line.
-
Step 5: Pull the lace through the eyelet, ensuring that it lays flat against the shoe and forms the first part of the checkerboard pattern.
-
Step 6: Repeat this process, alternating between the right and left sides, creating a series of diagonal lines that intersect to form a checkered pattern.
-
Step 7: Once you reach the top of the shoe, tie a knot to secure the laces in place.
-
Step 8: Adjust the tension of the laces as needed to ensure a snug fit.
Checkerboard lacing is a fun and playful way to add a touch of flair to your shoes. Whether you’re heading to a casual outing or a special event, checkerboard lacing is sure to make your shoes stand out from the crowd.
Hidden Knot Lacing:
Hidden knot lacing is a practical and stylish way to lace your shoes, keeping your laces tucked away for a clean and polished look. This lacing technique is perfect for those looking to maintain a neat appearance while ensuring that their laces stay secure throughout the day.
How to Hidden Knot Lace Your Shoes:
-
Step 1: Begin by inserting one end of the lace into the bottom eyelet of the shoe, leaving a small tail inside the shoe.
-
Step 2: Take the right end of the lace and thread it straight across to the opposite eyelet on the left side.
-
Step 3: Pull the lace through the eyelet, leaving a loop on the outside of the shoe.
-
Step 4: Cross the left end of the lace over to the opposite side, threading it through the loop created by the right lace.
-
Step 5: Pull the left lace through the loop, tightening the knot to secure the laces in place.
-
Step 6: Repeat this process, creating a series of loops and knots that run up the shoe in a layered fashion.
-
Step 7: Once you reach the top of the shoe, tie a knot to secure the laces in place.
-
Step 8: Tuck the remaining lace inside the shoe, hiding the knot and keeping your laces neat and tidy.
Hidden knot lacing is a great way to keep your shoes looking sharp and professional. Whether you’re heading to work, a special event, or just want to maintain a clean appearance, hidden knot lacing is a practical and stylish option that is sure to impress.
Printed Shoelaces: Your Sneakers’ Signature Style


Loop King Laces offers a unique opportunity for sneaker enthusiasts to elevate their style and make a statement with their footwear. Crafted with premium materials and meticulous attention to detail, Loop King Laces are more than just strings—they’re a means of self-expression.
With a wide range of colors, patterns, and materials available, Loop King Laces allows you to customize your sneakers to reflect your individuality. Whether you prefer a subtle, sophisticated look or want to make a bold, daring statement, Loop King Laces has the perfect laces for you.
Zipper Lacing:
Zipper lacing is a unique and eye-catching way to lace your shoes, creating a zigzag pattern that resembles the look of a zipper. This lacing technique adds a fun and stylish twist to your footwear, making it stand out from the crowd.
How to Zipper Lace Your Shoes:
-
Step 1: Begin by inserting one end of the lace into the bottom eyelet of the shoe, leaving a small tail inside the shoe.
-
Step 2: Take the right end of the lace and thread it straight across to the second eyelet on the left side.
-
Step 3: Pull the lace through the eyelet, ensuring that it lays flat against the shoe.
-
Step 4: Cross the left end of the lace over to the third eyelet on the right side, creating a diagonal line.
-
Step 5: Pull the lace through the eyelet, ensuring that it lays flat against the shoe and forms the first part of the zipper pattern.
-
Step 6: Repeat this process, alternating between the right and left sides, creating a series of diagonal lines that intersect to form a zipper pattern.
-
Step 7: Once you reach the top of the shoe, tie a knot to secure the laces in place.
-
Step 8: Adjust the tension of the laces as needed to ensure a snug fit.
Zipper lacing is a fun and creative way to add a unique touch to your shoes. Whether you’re heading to a casual outing or a special event, zipper lacing is sure to make your shoes stand out and get noticed.
Double Back Lacing:
Double back lacing is a stylish and secure way to lace your shoes, creating a layered look that adds a touch of flair to your footwear. This lacing technique is perfect for those looking to customize their shoes and ensure that they stay securely laced throughout the day.
How to Double Back Lace Your Shoes:
-
Step 1: Begin by inserting one end of the lace into the bottom eyelet of the shoe, leaving a small tail inside the shoe.
-
Step 2: Take the right end of the lace and thread it straight across to the second eyelet on the left side.
-
Step 3: Pull the lace through the eyelet, ensuring that it lays flat against the shoe.
-
Step 4: Cross the left end of the lace over to the third eyelet on the right side, creating a diagonal line.
-
Step 5: Pull the lace through the eyelet, ensuring that it lays flat against the shoe and forms the first part of the double back pattern.
-
Step 6: Repeat this process, alternating between the right and left sides, creating a series of diagonal lines that crisscross each other.
-
Step 7: Once you reach the top of the shoe, tie a knot to secure the laces in place.
-
Step 8: To create the double back effect, take the ends of the laces and thread them back through the eyelets, following the same path as before but in reverse.
-
Step 9: Continue this pattern, threading the laces back through the eyelets until you reach the bottom of the shoe.
-
Step 10: Tie a knot at the bottom to secure the laces in place and trim any excess lace.
Double back lacing is a versatile lacing technique that can be used to add a unique look to any pair of shoes. Whether you’re dressing up for a special occasion or just want to add some flair to your everyday look, double back lacing is sure to make your shoes stand out.
Closing
Loop King Laces offers a wide range of premium shoelaces that are designed to elevate your sneaker style. Made from high-quality materials and available in a variety of colors and styles, Loop King Laces are the perfect choice for anyone looking to add a touch of style to their DC shoes. With Loop King Laces, you can customize your shoes to reflect your unique style and personality, ensuring that you always stand out from the crowd.

Miles Anthony Smith
Miles is a loving father of 3 adults, devoted husband of 24+ years, co-chief sneakerhead (along with his wife Carolyn) at Loop King Laces, author, entrepreneur, investor, & owner of several businesses (AmaLinks Pro, Why Stuff Sucks, & Kompelling Kars). Miles has been featured in New York Magazine, Escapist Magazine, FashionSpot, Menswear Style, & Men Style Fashion. Loop King is trusted by sneakerheads JumperMan Kris, jumpmanbostic, ajinchicago, among others.


OFF-WHITE “SHOELACES”
Gold Tip Shoelaces
BROWSE LEATHER LACES
Gold Tip Shoelaces
BROWSE ROPE LACES
Gold Tip Shoelaces
BROWSE FLAT WAXED LACES
Gold Tip Shoelaces